
After hanging all 4 doors in Installing Magnets & Hanging your Doors (Part 3 of 7), your Flex Acre is ready for the plastics. Your Frame should be standing level with all 4 doors on their hinge pins, and your Root Chambers, Panels and Panel Plugs unpacked beside your assembly area. Keep the moving blanket or tarp spread out on the floor next to your Frame, as each Root Chamber is loaded flat before it goes in, and wear your safety glasses while you work.
Gather Tools:
- Moving Blanket or Tarp
- Safety Glasses
- Tank
- Tank Lid
- Tank Lid Supports
- Root Chambers
- Panels
- Panel Plugs
Step 1: Seat your Tank and Tank Lid
- Place the Tank into the Base Frame.
- Clean off any residue left from shipping, before the Tank Lid goes on, while you can still reach every corner.
- Place the Tank Lid onto the Tank.
- Stand the 3 Tank Lid Supports under the Tank Lid, evenly spaced down the middle of your Tank, as the arrows below show.
- Set each one so its bottom rests on the bottom of your Tank and its top tucks up under the rim of the Tank Lid.
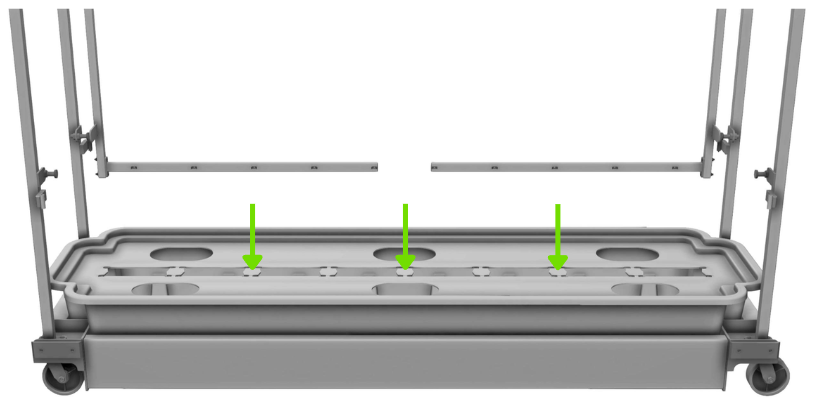
Your Tank holds roughly 80 gallons of water in operation, filled to about 3 inches below the top, so it is worth wiping out every corner while the Tank Lid is still off. The Tank Lid then becomes the floor that the bottom of all 16 Root Chambers rests on, which is what the 3 Tank Lid Supports underneath it carry. Spaced evenly down the middle, they land under the points where your Root Chambers meet. Counting 1 through 8 along the side you are standing on, one support sits between chambers 2 and 3, one between 4 and 5, and one between 6 and 7. Each one is a snug fit on purpose and is made to lift the Tank Lid a little, so expect to work it into place. Holding the Tank Lid up closes the gaps where algae grows and keeps your Panels sitting where the water can reach them.
Step 2: Load 8 Panels into each Root Chamber
- Lay a Root Chamber flat on your moving blanket or tarp.
- Find the top end of the Root Chamber, identified by the Drip Line cutouts.
- Slide 8 Panels in from that end, with the plant spaces facing up.
- Push the Panels all the way down to the rivets at the bottom of the Root Chamber.
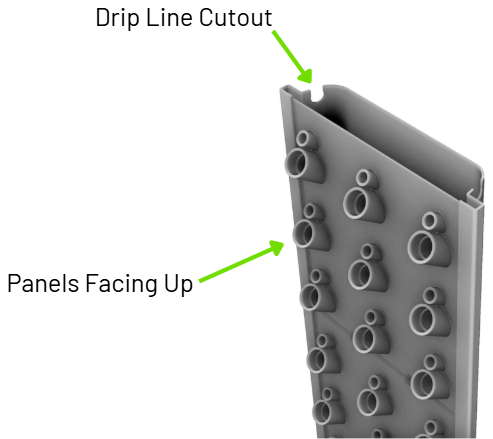
NOTE: THE RIVETS STOP THE WEIGHT OF A FULLY LOADED ROOT CHAMBER FROM PRESSING DOWN ON AND DEFORMING THE TANK LID.
Loading 8 Panels into every Root Chamber accounts for all 128 Panels that ship with your Flex Acre. Keep track of which end carries the Drip Line cutouts, as that end goes to the top of your Frame and your Drip Lines sit across it later in the install. You load, plug and seat one Root Chamber before you lay the next one down, so only one is on your blanket at a time.
Step 3: Insert your Panel Plugs
- Open your 4 bags of Panel Plugs.
- Insert a Panel Plug into every open plant space on the loaded Panels.
NOTE: PANEL PLUGS STOP WATER FROM ESCAPING THROUGH ANY UNOCCUPIED PLANT SPACES WHILE YOUR FLEX ACRE RUNS.
A full Flex Acre carries 1,152 plant spaces, so this is a good task for any extra hands on site. You can also come back to it later if you are pressed for time during the install.
Step 4: Set all 16 Root Chambers in Place
- Lift a loaded Root Chamber.
- Push the top of the Root Chamber up through the Cradle.
- Line the bottom of the Root Chamber up with the Tank Lid.
- Lower the Root Chamber into position.
- Repeat Steps 2 through 4 with the next Root Chamber, until one side of your Flex Acre carries 8 Root Chambers.
- Work the second side the same way, until all 16 Root Chambers are installed.
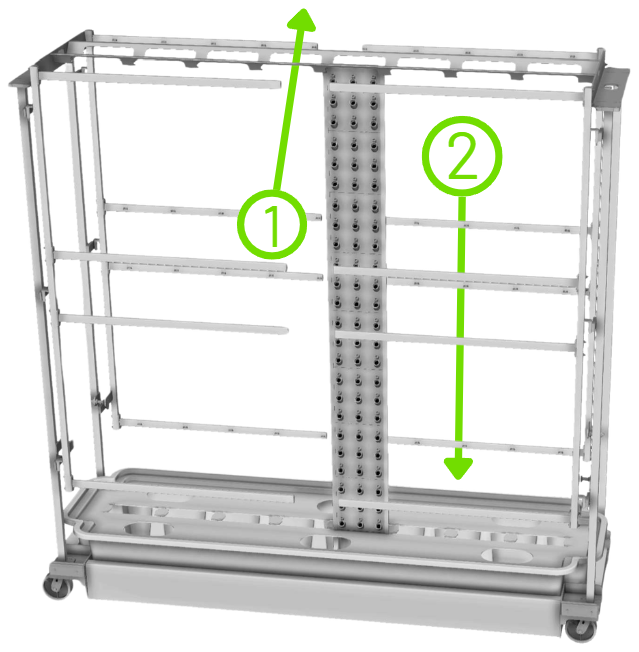
Each side of your Flex Acre holds 8 Root Chambers, and the second side goes in the same way as the first. Once a side is finished, check that every Drip Line cutout sits at the top, up under the Cradle. That is where your Drip Lines and Top Caps go later in the install.
Once all 16 Root Chambers are seated, you can begin filling your Flex Acre with water if you plan a same day water test.
CAUTION: IF YOU PLAN A SAME DAY WATER TEST AND SKIPPED THE PANEL PLUGS, WATER CAN SPRAY OUT OF THE OPEN PLANT SPACES AND TRIP THE LIGHTS. HOSES AND WATER ALSO CREATE HAZARDOUS FLOOR CONDITIONS.
Your Tank, Root Chambers and Panels are now installed—well done!