
After you finish Installing your Tank, Root Chambers & Panels (Part 4 of 7), your 4 doors are hanging and ready for lights. Your Flex Acre carries 40 Light Bars, 10 on every door, wired together in an S pattern and run through 2 double sided timers. Work one door at a time, use a ladder that reaches 10 ft (3 m) for the top row, and wear your safety glasses while you work overhead.
Gather Tools:
- Light Bars
- Lighting Kit
- Ladder
- Safety Glasses
Step 1: Mount the Light Bars on a Door
- Gather all 40 Light Bars and your Lighting Kit next to the first door.
- Set 5 Light Bars aside for the bottom row.
- Insert a light connector into each of those 5 Light Bars, at the end closest to the switch.
- Open a door.
- Place the 5 Light Bars switch-side-up along the bottom row, so that 4 in (10 cm) of each one sticks up above the second Light Arm.
- Place 5 more Light Bars switch-side-down above the first row.
- Firmly hold the bottom row in place while you pull the top Light Bars down onto the connectors, one at a time.
- Repeat this process on the 3 remaining doors, until all 4 doors carry Light Bars, 10 per door and 40 in total.
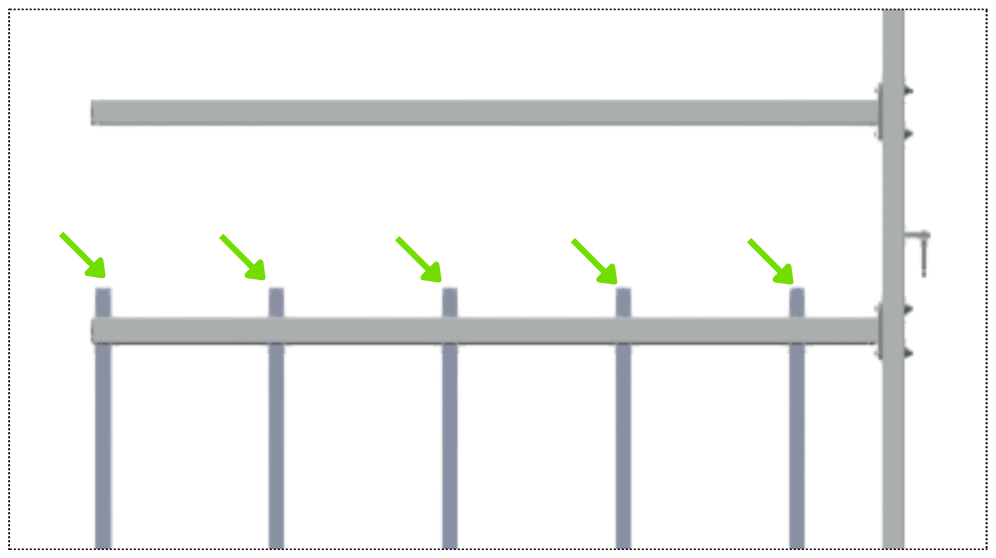
The 4 in (10 cm) of Light Bar standing above the second Light Arm is what the top row seats onto, so set the bottom row at that height before you join the rows.
Step 2: Install the Power Cords
- Take the 4 power cords out of your Lighting Kit.
- Find the receptacle you plan to pull power from.
- Install one power cord on each door, at the Light Bar closest to the Corner Post.
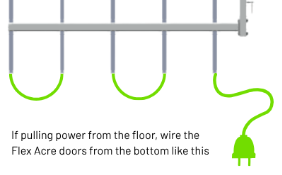
NOTE: IF YOU ARE PULLING POWER FROM A CEILING OR A HIGH WALL RECEPTACLE, PLUG THE CORD INTO THE TOP CORNER LIGHT BAR. IF YOU ARE PULLING POWER FROM THE FLOOR OR A LOW WALL RECEPTACLE, PLUG THE CORD INTO THE BOTTOM CORNER LIGHT BAR.
Step 3: Connect the Jumpers in an S Pattern
- Take the jumpers out of your Lighting Kit.
- Start at the next Light Bar in line from the power cord.
- Connect each Light Bar to the next one with a jumper, alternating from the top row to the bottom row in an S pattern.
- Work down the door until every Light Bar on it is connected.
- Place a light cap on the open plug of the last Light Bar.
- Repeat this jumper run on the 3 remaining doors.
One power cord feeds an entire door, so every Light Bar on that door has to be linked into the same run. The S pattern carries the jumpers up and back down the two rows until the run ends at the last Light Bar.
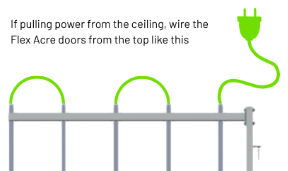
NOTE: THE LIGHT CAP KEEPS WATER OUT OF THE OPEN END OF THE LAST LIGHT BAR.
Step 4: Connect your Timers and GFCI Adapters
- Take both double sided timers and the GFCI Adapters out of your Lighting Kit.
- Stand facing the widest side of your Flex Acre, as that is what sets your left side and your right side.
- Plug the power cords on the left side into one double sided timer.
- Plug the power cords on the right side into the other double sided timer.
- Plug each double sided timer into one of the provided GFCI Adapters.
- Plug the GFCI Adapters into any available outlet when you are ready to run the lights.
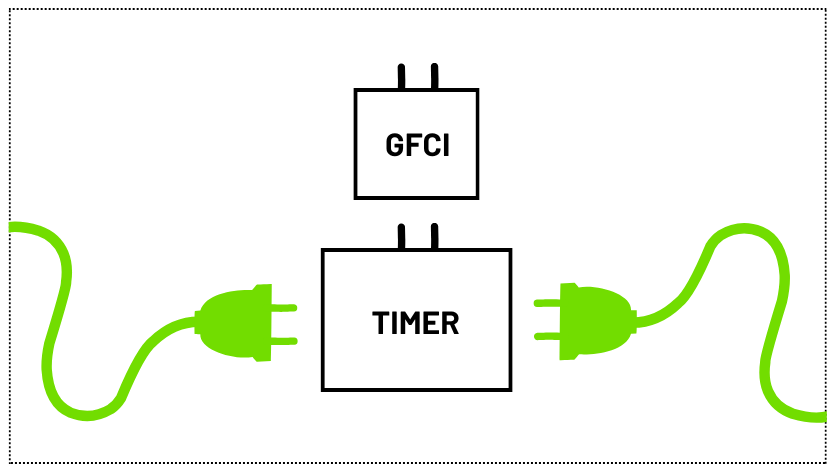
NOTE: GFCI ADAPTERS TRIP IF THE LIGHTING SYSTEM IS DIRECTLY EXPOSED TO WATER, AND THAT IS WHAT PREVENTS SHORTING AND DAMAGE. A TRIPPED ADAPTER IS THE FIRST THING TO CHECK IF YOUR LIGHT BARS DO NOT COME ON.
CAUTION: KEEP WATER OFF THE LIGHT SYSTEM. THE LIGHT BARS ARE NOT WATERPROOF.
Keep hoses and spray away from your Light Bars while you work, as water reaching the light system is what trips your GFCI Adapters.
Your Light Bars are mounted, wired and ready for power—well done!