
After finishing Installing & Wiring your Light Bars (Part 5 of 7), you can begin the irrigation assembly. This is the vertical line that carries water from the Tank up to the 2 Drip Lines sitting over your Root Chambers. Wear your safety glasses and set a ladder next to your Flex Acre, as the last connections are made up at the Cradle.
Gather Tools:
- Irrigation Kit
- Primary Pump
- Drip Lines
- Water Level Tool
- Lid Plugs
- Top Caps
- Velcro Strips
- Ladder
- Safety Glasses
Step 1: Set your Primary Pump
- Locate the Primary Pump and the large pump filter bag included in the Irrigation Kit.
- Place the pump inside the bag with the power cord trailing out.
- Lower the bag into the Tank through one of the holes in the corner of the Tank Lid.
- Keep the power cord up and outside of the Tank.
CAUTION: DO NOT PLUG IN THE PUMP AT ANY POINT DURING ASSEMBLY.
NOTE: A BACKUP PUMP SHIPS WITH EVERY FLEX ACRE IN CASE OF EMERGENCIES. IF THE PRIMARY PUMP FAILS, DEPLOY THE BACKUP PUMP AND CONTACT FORK FARMS FOR A REPLACEMENT.
Step 2: Clip on your Water Level Tool
- Clip a Water Level Tool to the Tank Lid hole next to the one holding the pump.
- Keep your water level between the MIN and MAX lines on the Water Level Tool once your Tank is filled.
CAUTION: KEEP THE WATER ABOVE THE TOP OF THE PUMP. RUNNING A PUMP DRY DAMAGES IT.
You fill your Tank in Part 7 of this series, and the Water Level Tool is what you read from that point on, as the pump has to stay under water.
Step 3: Build your Vertical Line
- Insert pipe "A" firmly down into the pump fitting.
- Place the Lid Plug with the hole drilled into it over pipe "A".
- Set the other 5 Lid Plugs into the remaining Tank Lid holes.
- Connect pipe section "B" to section "A".
- Attach the assembly holding the Drain Valve, the Main Send Valve (called the primary valve in your Assembly Manual) and the Disc Filter to pipe section "B".
- Fasten the 3/4 in pipe clips to the adjacent Corner Post with 2 velcro strips.
- Attach pipe section "C" to section "B".
- Fasten the 4 remaining pipe clips with velcro.
NOTE: THE PIPE CLIPS GIVE YOU FIRM STRUCTURAL POINTS FOR STRAPPING THE IRRIGATION ASSEMBLY TO THE FRAME.
We recommend rinsing your Disc Filter twice a week once your Flex Acre is growing, and the steps are in Cleaning your Disc Filter (Part 2 of 4).
Step 4: Run Pipe D to your Drip Lines
- Maneuver both 1/2 in elbows from the pipe section "D" assembly up into the opening of the Cradle.
- Set both Drip Lines on top of the Root Chambers with the open ends closest to pipe section "D".
- Attach both elbows to their Drip Lines.
- Finish attaching pipe section "D" to section "C".
- Point the holes in the Drip Lines toward the Panels.
- Press down on each Drip Line to snap it into position.
- Place the Top Caps on top of the Root Chambers once both Drip Lines are secure.
The left and right Drip Lines are identical, so either one fits either side of your Flex Acre.
Step 5: Check your Finished Line
- Compare your finished line against the Vertical Irrigation Diagram below.
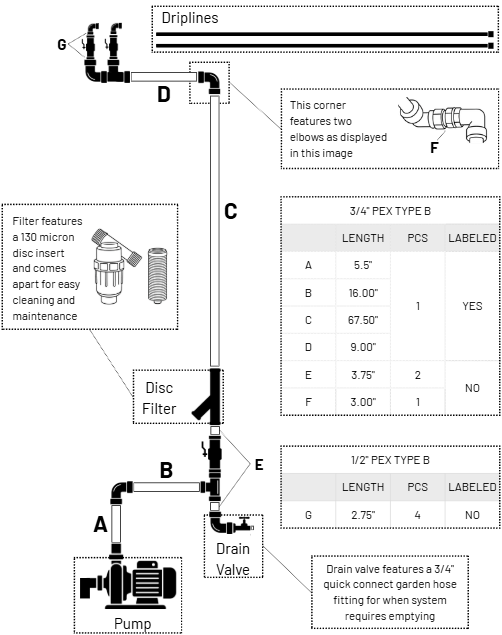
- Trace the water path from the Primary Pump into pipe "A" and along pipe "B".
- Trace it on through the Disc Filter, up pipe "C" and into pipe "D".
- Trace it around the 2 elbows and out to both Drip Lines.
- Confirm your Disc Filter is seated and locked, as a loose Disc Filter leaks the moment the pump runs.
- Confirm your Drain Valve hangs off the bottom of the vertical line near pipe "B".
Your Disc Filter comes apart for cleaning and carries a 130 micron disc insert. Your Drain Valve takes a 3/4 in quick connect garden hose fitting, so you can empty your Flex Acre from the bottom of the line without taking a pipe apart.
Your irrigation line is now assembled and ready for water—well done!