
After Assembling your Irrigation Line (Part 6 of 7), your Flex Acre is built and ready for function testing. Follow these steps to run a leak check on your water lines, confirm your Light Bars come on, and place your decals.
Gather Tools:
- Water Level Tool
- Garden Hose
- Ladder
- Serial Number Decal
- Flex Acre Branded Magnet
- Fork Farms Branded Magnet
Step 1: Fill your Tank
- Fill your Tank with water if you did not already fill it during assembly.
- Watch the MIN and MAX lines on the Water Level Tool as the water rises.
- Stop filling once the level sits between the MIN and MAX lines.
Keep your water level between the MIN and MAX lines for the whole test, not only at first fill. Your Tank holds roughly 80 gallons in operation, so watch the Water Level Tool as the hose runs rather than checking it once at the end.
Step 2: Confirm your Fittings & Valves
- Check that your Disc Filter is correctly seated and locked in place.
- Check every irrigation fitting the same way, working from your Primary Pump up to both Drip Lines.
- Confirm the Main Send Valve (called the primary valve in your Assembly Manual) just below your Disc Filter is in the OPEN position.
- Confirm the Drain Valve at the bottom of the vertical line is CLOSED.
A fitting that is seated but not locked will hold at rest and let go under pump pressure, which is what the next step is looking for. Your 2 valves matter in opposite directions: a closed Main Send Valve starves your Drip Lines, and an open Drain Valve sends your tank water onto the floor.
Step 3: Run the Leak Check
- Plug in the pump.
- Walk the length of your Flex Acre.
- Inspect the vertical irrigation line for water.
- Climb your ladder.
- Inspect both Drip Lines and the 2 elbows at the Cradle.
CAUTION: KEEP WATER AWAY FROM YOUR LIGHT BARS WHILE THE PUMP RUNS. THE LIGHT BARS ARE NOT WATERPROOF.
If you find water escaping, unplug the pump, reseat the leaking fitting, and plug the pump back in. Walk your Flex Acre again, and repeat until every fitting runs dry. A run time of 10 minutes with no leaking marks success.
If you skipped seating your Panel Plugs during assembly, use caution through this test as water can spray out of the open plant spaces and trip your lights.
Step 4: Test your Light Bars
- Confirm the power switch on each of your 40 Light Bars is set to ON.
- Set both double sided timers to always ON for the test.
- Plug in both GFCI Adapters.
- Confirm every Light Bar on all 4 doors is lit.
- Set both double sided timers to 18 continuous hours per day once your lights are verified.
If your lights do not come on, check both GFCI Adapters first and confirm neither one has tripped. If they are still dark, inspect the wiring and confirm every connection is solid. Your Light Bars run 18 continuous hours per day, 16 hours at minimum. That is the schedule your timers hold from here on, and it is on your Quick Reference Guide.
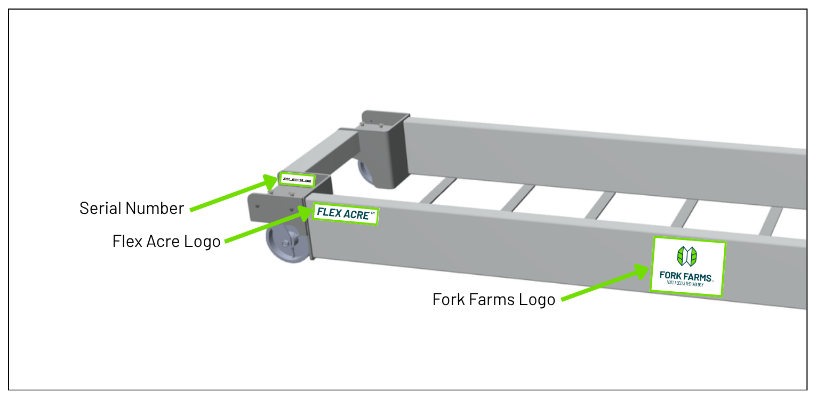
Step 5: Place your Decals
- Look for a serial number on your Base Frame.
- Choose which side of your Flex Acre is the front if no serial number is present.
- Place the Serial Number Decal in its designated position.
- Place the Flex Acre Branded Magnet in its designated position.
- Place the Fork Farms Branded Magnet in its designated position.
The front is typically the side facing the door to the room or another viewing space.
Commissioning is handled separately by Fork Farms, so your assembly is finished once your leak check and your lights pass. Everything after this point is the operating side of your Flex Acre.
Your Flex Acre is assembled, dry and lit—well done!