
Follow the instructions in this article to count your Flex Acre shipment against the pack out list before you assemble anything. Every part below carries the item number and quantity printed in your Assembly Manual, so you can work down the list and mark off what you have in hand. Confirm your room is ready first in Flex Acre Site Requirements & Specs.
Checking your Shipment
Your Flex Acre ships with its parts packed inside your Tank, so your count happens as you unpack. Keep this page open beside your shipment and work the list below.
- Unpack and sort your shipment as described in Unpacking & Preparing your Assembly Area (Part 1 of 7).
- Count each sorted pile against your parts list below.
- Mark off every line as you go.
- Note any line that is short or damaged before you assemble anything.
NOTE: LEAVE ALL HARDWARE PACKED AS-IS UNTIL THE STEP THAT CALLS FOR IT.
Counting first costs you a few minutes. A short bag of Corner Hardware is a small problem on your floor and a large one once your Base Frame is already tipped on its side. Clearing your floor and building your piles belong to Part 1 of 7, so use this page as the list you check those piles against.
Your Flex Acre Parts List
| # | Part | Qty |
|---|---|---|
| STEEL COMPONENTS | ||
| 1 | Base Frame | 1 |
| 2 | Cradle | 1 |
| 3 | Corner Post | 4 |
| 4 | Door Hinge Post | 4 |
| 5 | Light Arm | 16 |
| PLASTIC COMPONENTS | ||
| 6 | Tank | 1 |
| 7 | Tank Lid | 1 |
| 8 | Tank Lid Supports | 3 |
| 9 | Root Chambers | 16 |
| 10 | Panels | 128 |
| 11 | Top Caps | 16 |
| 12 | Lid Plugs | 6 |
| LIGHTS | ||
| 13 | Light Bars | 40 |
| IRRIGATION | ||
| 14 | Primary Pump | 1 |
| 15 | Backup Pump | 1 |
| 16 | Irrigation Kit | 1 |
| 17 | Drip Lines | 2 |
| HARDWARE | ||
| 18 | Corner Hardware | 1 |
| 19 | Door Hardware | 1 |
| 20 | Magnet and Bumper Hardware | 1 |
| 21 | Lighting Kit | 1 |
| 22 | Spare Hardware | 1 |
| ACCESSORIES | ||
| 23 | Panel Plugs (bags) | 4 |
| 24 | Water Level Tool | 4 |
| 25 | Grower Toolkit | 1 |
| DECALS | ||
| 26 | Fork Farms Branded Magnet | 1 |
| 27 | Flex Acre Branded Magnet | 1 |
Your 5 Hardware lines are counted as one set each, so confirm each set is present rather than counting individual fasteners.
Your Accessories and Decals lines are small and easy to pass over. Your 4 bags of Panel Plugs fill the plant spaces your crop does not use, and your 4 Water Level Tools clip to your Tank Lid. Your Fork Farms Branded Magnet and Flex Acre Branded Magnet go on whichever side of your Flex Acre you choose as the front.
NOTE: A BACKUP PUMP SHIPS WITH EVERY FLEX ACRE. IT IS A SPARE, NOT A SECOND PUMP TO INSTALL. KEEP IT BOXED IN CASE THE PRIMARY PUMP FAILS.
Counting your High Quantity Lines
These 5 lines carry counts high enough to miscount, and each one is called for by name later in your build. Count these by group rather than one piece at a time.
- Count your 128 Panels in stacks of 8, one stack for each Root Chamber.
- Count your 16 Root Chambers as 8 per side of your Flex Acre.
- Count your 40 Light Bars as 10 per door across your 4 doors.
- Count your 16 Light Arms as 4 per door.
- Count your 16 Top Caps against your 16 Root Chambers.
Your 3 Tank Lid Supports are the shortest line on the list and the easiest to leave sitting in the packaging. Set them aside with your Tank Lid. They go underneath it in Installing your Tank, Root Chambers & Panels (Part 4 of 7).
Matching Parts to the Exploded Views
The exploded views name every steel and plastic part in position, which is faster than reading a label when the part is already in your hands. Use them to settle any line you cannot match by name.
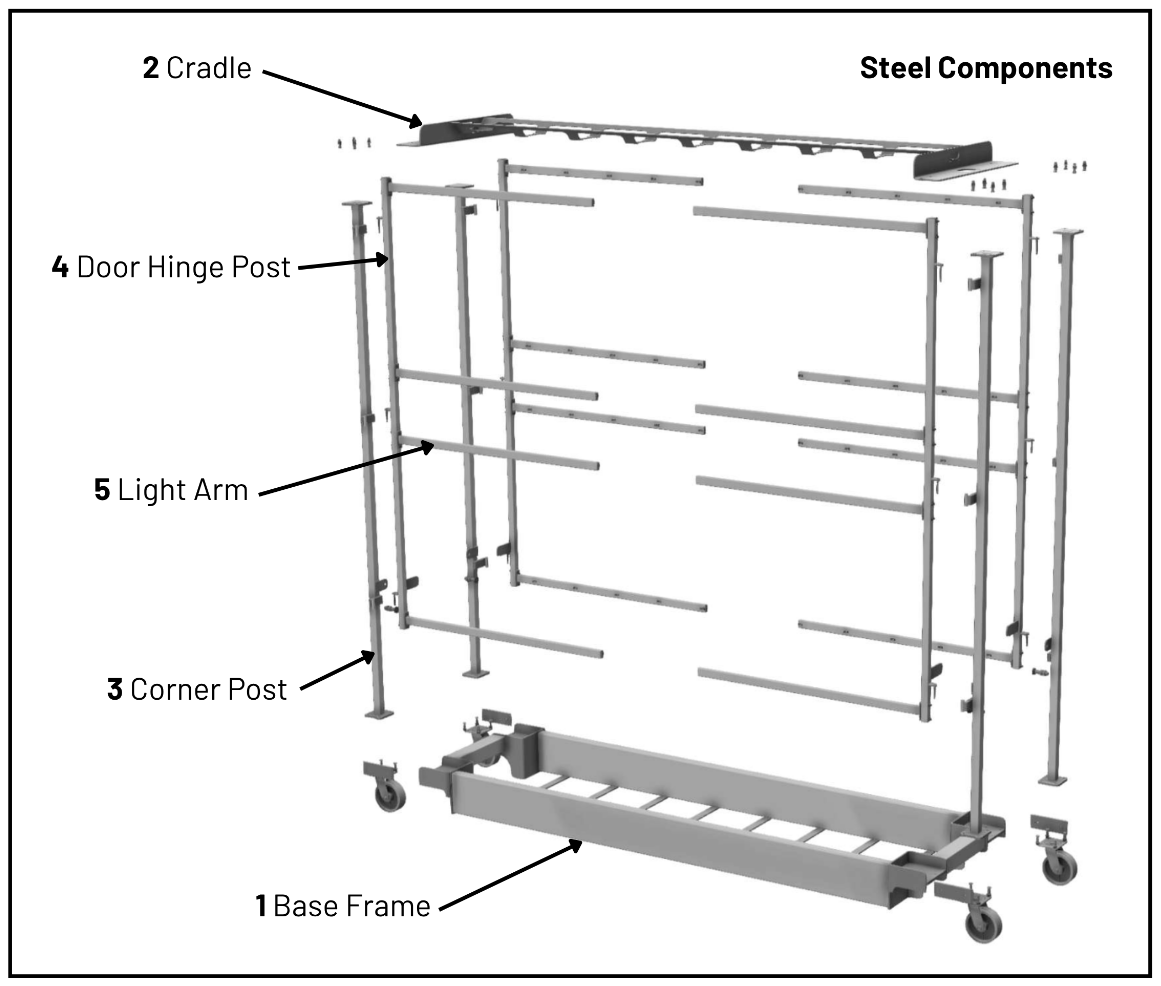
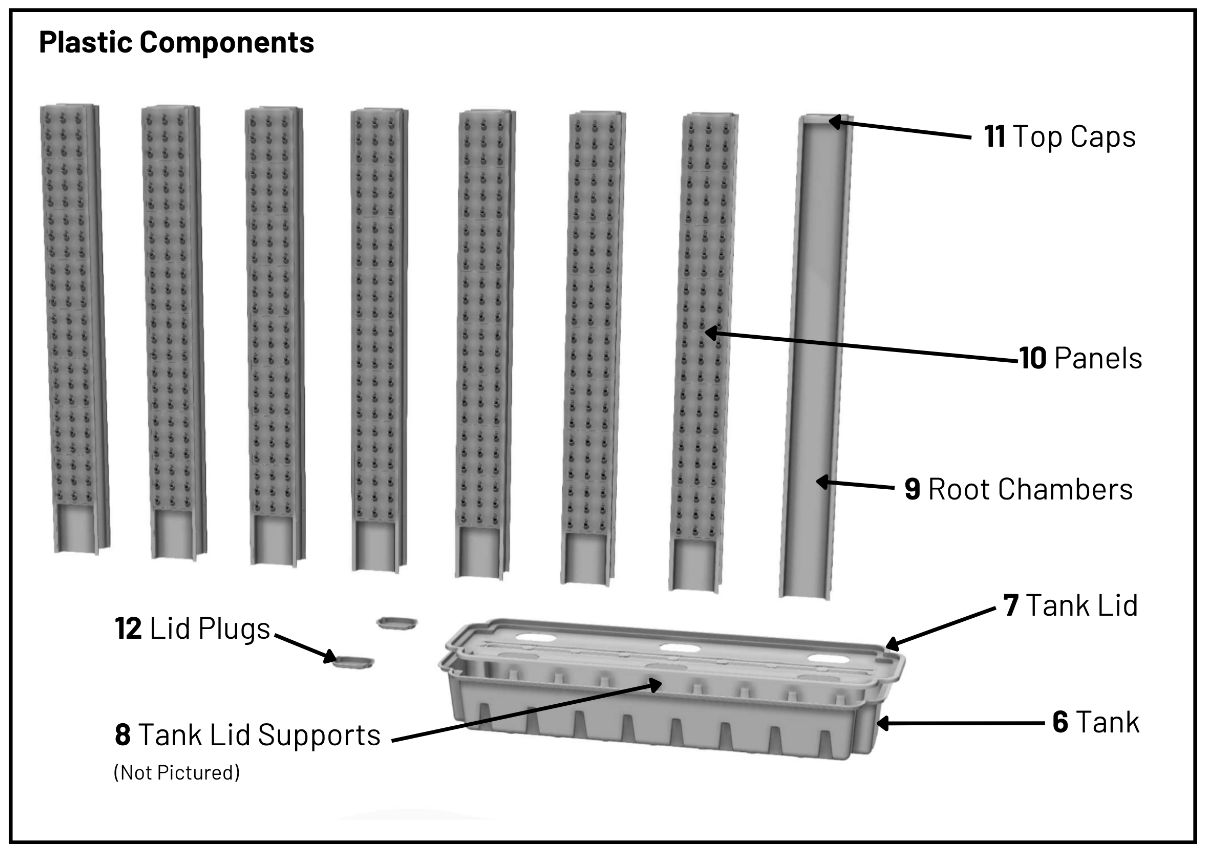
The Steel Components view covers items 1 through 5 and the Plastic Components view covers items 6 through 12. Items 13 through 27 are not drawn, so match those against the group headings in your table above.
Each Corner Post carries a letter label on its mounting plate. Keep those labels facing up as you sort, as each post has one matching position on your Base Frame.
Reporting a Missing or Damaged Part
- Stop before you assemble anything.
- Note the item number and the quantity you are short from the parts list above.
- Contact our support team with that item number.
Use any of the lines below.
- Email: support@forkfarms.com
- Toll free: 877.886.7736
- Direct: 920.515.0730
Do not substitute a part from a hardware store while you wait. Build with the parts Fork Farms supplied, and leave them unmodified. Our support team will send the correct part.
Your shipment is counted, sorted and ready to build—well done!
Next: Unpacking & Preparing your Assembly Area (Part 1 of 7)